


Midocean API Data Fetch for WooCommerce with No Code
Introduction
For e-commerce businesses running WooCommerce, keeping your product data updated is critical. With Midocean API data fetch for woocommerce with no code, you can fetch and sync product and post data automatically with no coding required. This guide provides a full technical workflow, including tabulated data import, two-way API fetch, Postman testing, and custom WooCommerce API sync.
Whether you’re a store owner or developer, this post will give you step-by-step instructions to automate your store, save time, and maintain accuracy.

Why Use Midocean API for WooCommerce
- No Code Implementation: Fetch product and post data without touching PHP.
- Time-Saving: Automate imports, updates, and inventory sync.
- Two-Way Sync: Supports sending data back to Midocean for updates.
- Flexible Integration: Works with custom attributes, categories, and variations.
- Professional Workflow: Ideal for WooCommerce stores with large inventories or frequent updates.

Prerequisites
Before starting, ensure you have:
- WooCommerce installed and active
- Admin access to WordPress
- Midocean API credentials: API key and endpoint URL
- Postman installed for API testing
- Basic knowledge of JSON and REST APIs
- Optional: wp all import plugin installed for content import

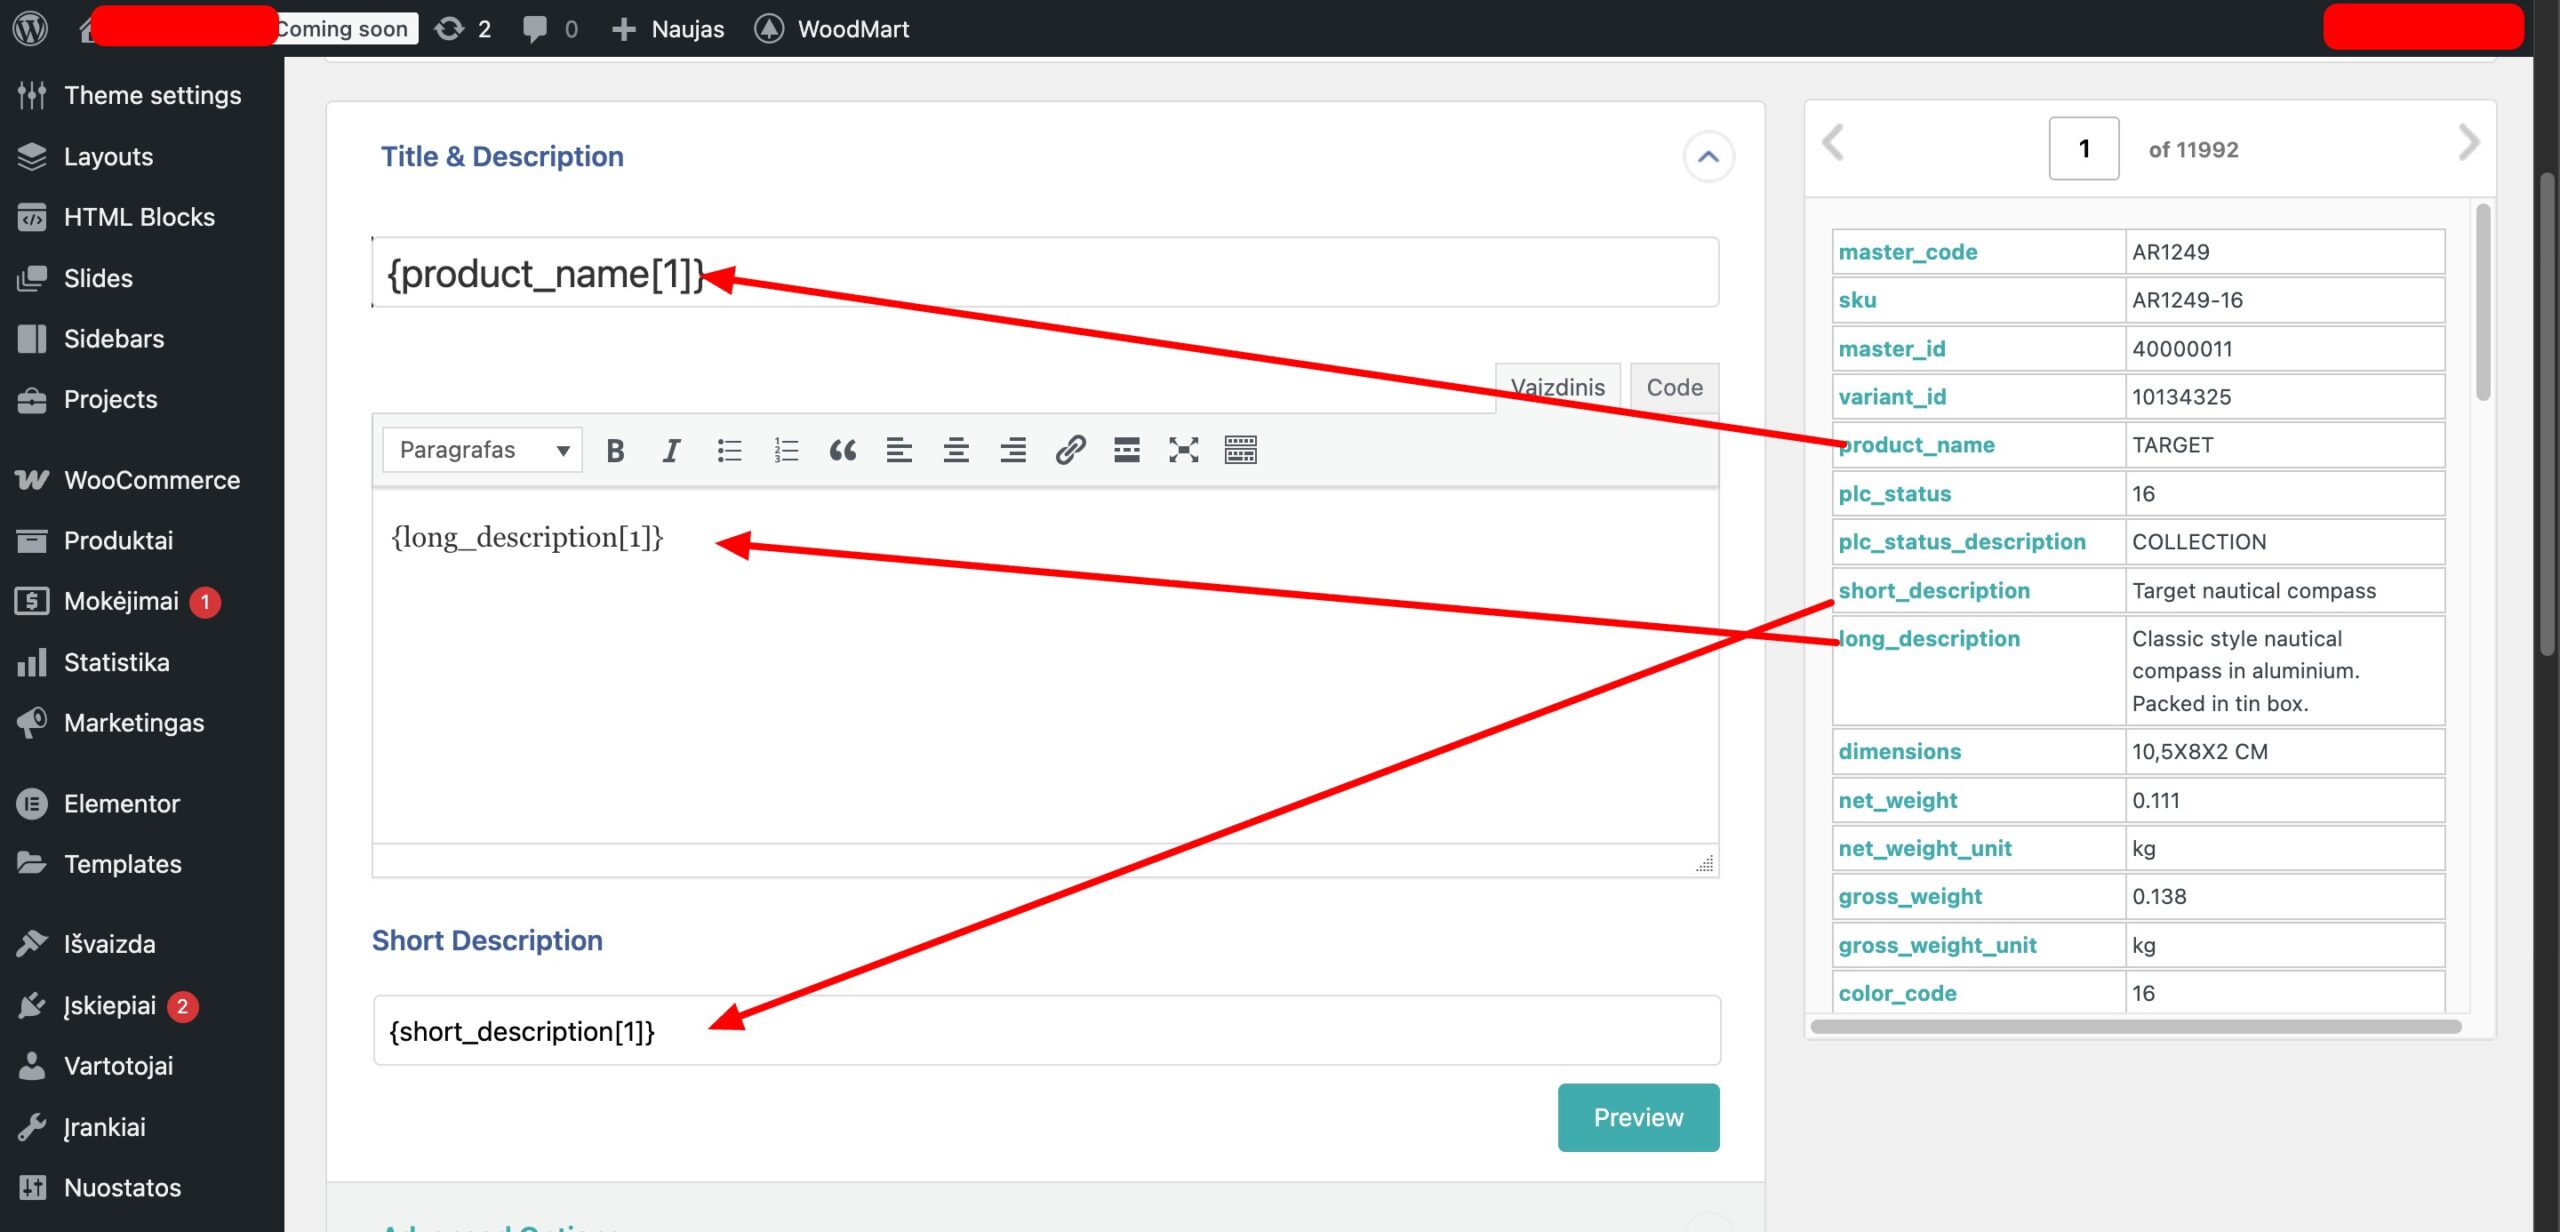
Step 1: Prepare Data in Tab Format
Tabulated Data Approach:
- Create a CSV or Excel file containing your products or posts. Example columns:
| Product Name | SKU | Price | Short Description | Full Description | Category | Image URL | Stock Quantity | Tags |
|---|
- Ensure all fields are consistent and mandatory fields are filled.
- For WooCommerce variations, use a separate row for each variation with the same parent SKU.
Why tab format:
- Simplifies bulk import
- Ensures accurate mapping to WooCommerce fields
- Makes it easier to test via Postman before full sync

Step 2: Two-Way API Fetch using Postman
Step 2.1: Fetch Data from Midocean API
- Open Postman
- Create a GET request to Midocean API endpoint:
GET https://api.midocean.com/products
Headers:
Authorization: Bearer YOUR_API_KEY
Content-Type: application/json
- Preview the JSON response to confirm all required fields are available.

Step 2.2: Push Data to WooCommerce API (Two-Way Sync)
- Create a POST request to WooCommerce custom API endpoint:
POST https://yourdomain.com/wp-json/wc/v3/products
Headers:
Authorization: Basic BASE64_ENCODED_KEY
Content-Type: application/json
Body (raw JSON):
{
  "name": "Sample Product",
  "type": "simple",
  "regular_price": "29.99",
  "description": "Full description here",
  "short_description": "Short description here",
  "categories": [{"id": 15}],
  "images": [{"src": "https://yourdomain.com/image.jpg"}]
}
- Test the response code 201 for successful creation.
Step 2.3: Two-Way Sync Automation
- Use Postman’s Collection Runner to automate fetch and push
- Schedule API requests daily or hourly using cron jobs

Step 3: WooCommerce Custom API Sync
Step 3.1: Enable WooCommerce REST API
- Go to WooCommerce → Settings → Advanced → REST API
- Click Add Key → enter description, select user, permissions:
Read/Write - Copy Consumer Key & Consumer Secret
Step 3.2: Sync Products Programmatically
- Use the custom PHP script or plugin that connects to Midocean API
- Map JSON fields from Midocean to WooCommerce fields
- Ensure stock, pricing, and variations are correctly synced

Step 4: Map Midocean Data to WooCommerce Fields
| WooCommerce Field | Midocean Field | Notes |
|---|---|---|
| Product Name | name | Mandatory |
| Price | price | Supports decimal |
| SKU | sku | Unique identifier |
| Short Description | short_desc | Optional |
| Full Description | full_desc | Supports HTML |
| Images | image_url | Multiple URLs comma-separated |
| Categories | category_name | Map to existing WooCommerce categories |
| Stock Quantity | stock | Integer only |
| Tags | tags | Optional, comma-separated |
Tip: Validate JSON mapping before running full import.
Step 5: Automate Updates
- Use WP-Cron or server cron jobs for scheduled imports
- Configure frequency: hourly, daily, or weekly
- Log errors and successful imports for debugging
- Optionally, enable two-way updates: changes in WooCommerce can reflect back to Midocean

Step 6: Verify Imported Data
- Go to WooCommerce → Products
- Check titles, descriptions, images, categories, and variations
- Test checkout and stock updates
- Ensure price, SKU, and stock are accurate
Pro Tip: Use WooCommerce product importer preview mode for a test run
Step 7: WP All Import CSV Integration for WooCommerce
WP All Import is a powerful plugin to import products from CSV files into WooCommerce. This step allows you to import bulk products generated via Midocean API without any coding.
Step 7.1: Prepare Your CSV
-
Export Midocean API data into a CSV or Excel file.
-
Include essential fields:
-
Product Name
-
SKU
-
Price
-
Short Description
-
Full Description (HTML supported)
-
Category
-
Image URLs
-
Stock Quantity
-
Tags
-
Tip: For variations, ensure each variation has the same parent SKU.
Step 7.2: Configure WP All Import
-
Go to Plugins → Add New → Search “WP All Import”
-
Install and activate WP All Import + WooCommerce Add-On
Step 7.3: Import CSV
-
Go to All Import → New Import → Upload CSV file
-
Select WooCommerce Products as post type
-
Map your CSV columns to WooCommerce fields:
-
Product Name → Name
-
SKU → SKU
-
Price → Regular Price
-
Short Description → Short Description
-
Full Description → Description
-
Categories → Category
-
Image URLs → Product Images
-
Stock Quantity → Stock
-
Tags → Tags
-
Step 7.4: Run Import & Verify
-
Click Continue → Confirm & Run Import
-
Check imported products in WooCommerce → Products
-
Ensure HTML formatting, images, and variations are correctly imported

Pro Tip:
-
Schedule automatic imports with WP All Import Pro and cron jobs for continuous Midocean API sync.
-
Works for bulk products or posts with rich content, keeping your WooCommerce store always updated.
Conclusion
Using Midocean API Data Fetch for WooCommerce with no code provides a complete professional workflow for automated e-commerce data management.
Key takeaways:
- Tabulated data import ensures accuracy
- Two-way API fetch guarantees sync between WooCommerce and Midocean
- Postman testing validates your workflow
- Custom API sync automates large inventories
- Wp all import support keeps your product descriptions editable and rich
With this setup, store owners can save hours of manual work, maintain consistent data, and scale operations efficiently.